Used oxy propane to try welding the nichrome wire. It melted but I don't think it made a good connection. Kind of hard to weld without a backing.
The oven in now cooking out the latest refractory patching and satanite coating. Will run it for 12 hours at 90C then crank it up and watch the splice burn out. Then I will try sandwiching the wires between washers on a screw.
--------------------------------------
Next day: Ran in up to, 400, 550, then 700C. I am letting it soak at 700C for a while. I am going to bake my native sand and play sand at that temperature to see how they compare. An hour or two should do it.
As mentioned earlier I fired the oven earlier and the crimped connection on the coil failed. I pulled the heating element and refractory bricks.
Yesterday I refitted the refractory brick and used a bit mortar to lock them in place. The down side is I need to wait for the mortar to set. The idea is that the lime is supposed to calcify as the Portland cement burns out. The cement has to be strong enough to get to that point.
The mortar is 10 : 6 : 2 : 3 – Silica Flour, Native Clay, Portland cement, and Lime. The original formula called for sand and fire clay. Silica flour makes the mix smoother easier to apply. I don't have fire clay. My native clay shrinks less than bentonite clay. I want to try this formula with sand and perlite to see how it does as a castable refractory. The satanite does not want to stick to some of the surfaces I applied it to in the oven.
I started the coil repair by cutting copper strips to use as a crimps. In theory I only needed one but made several in an assortment of random sizes.
The entire lot was annealed .
A strip was reduced in thickness and work hardened in the roller mill.
After all the effort I was unable to get the wires crimped on top of each other. The notch on the top edge of the bar was supposed to be a crimp form. It ended up being to wide. I should have taken the time to make a correct one. As you will see later this crimp may not last long.
Because people need to see goofs. And this is what happens when you get tired of something and say 'good enough' when you know its not.
The over has an exterior shell of fiber insulation. Inside that is a layer of 1" soft fire brick. Inside that is the heating element.
Some of the soft fire brick were in bits so I replaced the back top and side bricks with my refractory test bricks. The side bricks are shorter and I only had one. A long one was cut with a serrated knife. This is the cut off. You can see there is moisture remaining in the brick.
The top of the oven is initially on the left in this video.
I put a refractory test cube from the same batch as the bricks I used and ran the oven at 80C overnight to dry the refractory bricks.
The next morning I removed the cube and broke it. It was dry. The refractory from the wet vs dry clay test. This is one of the dry blocks. It is noticeably weaker after heating overnight at 80C.
With the oven working I will be able to further test refractory. High on that list is the addition of lime and my native clay vs western bentonite.
The crimp is not effective. If the wires were in good contact, the contact area would have less resistance and it would not be hotter than the surrounding wire.
I ramped the oven up to 700C in several step.
Then I noticed I had neglected to install the bottom cover plate. It most likely would not have been a problem but lets play it safe kinda of thing.
Currently I have the heating element and the insulating bricks back out. My fear was the DIY refractory bricks would crumble. It is easy to brush material from the surfaces but they did not break. A coat of satanite should firm up the surfaces.
The satanite will take a day or two to dry. So this may continue through the week.
Pottery sites tell that bentonite is used in glazes to keep the other components in suspension. It shrinks too much to be used alone for use as a clay body. Even drying also is a problem. Clay body is what these folks call their clay.
Does mixing bentonite with Portland cement and sand change this. I have no idea. To find out I will be molding bricks that fit in my burnout oven. If they don't crack or fall apart when drying I will try them in the oven to see how they stand up to the heat.
I have determined that mixing the cement and immediately adding the clay makes for a very weak brick. To be fair the people at Back Yard Metal Casting were possibly mixing by hand which allowed the cement sufficient time to hydrate.
Earlier I made 2 brick adding the clay immediately after the other ingredients. The original recipe states the clay should be added after the other ingredients are mixed.
At some point I am will want to refer back to these experiments. To make that easier I will be naming them.
This experiment is HYDRATE A:
Determine if it is better to pre hydrate the clay or add it dry.
Each time water is added it will be noted so that next time a more correct amount can be added earlier where possible. The premise is that its better not to sneak up on the water adding it bit by bit. With the clay you can end up adding water about as fast as the clay absorbs it. Always fighting a stiff mixture.
I am not especially happy lining the forms with packing tape. Lubricants will not work because I may coat these bricks with satanite Thinking about placing a sheet of paper in the bottom of the form.
Hydrated Clay Procedure:
Added 51 oz. water to the clay and let it rest over night.
Add water to the remaining ingredients with the power mixer.
Allow the mixture to rest 10 minutes for cement hydration
Add the clay to the mix and blend with the power mixer adding water if needed.
Immediately place mix in forms.
Scratch HC into the brick.
Dry Clay Procedure
Add water to everything but the clay to get the desired consistency.
Allow the mixture to rest 10 minutes for cement hydration.
Add the amount of water used in the Wet Clay procedure.
Add the dry clay.
Mix with the power mixer adding water if needed. Record water.
Immediately place mix in forms.
Scratch DC into the brick.
I have hydrated the clay and recorded the water used. The clay is a bit stiff but should work when mixed with the other ingredients.
The refractory from experiment HYDRATE A is in the brick molds. The Dry Clay Procedure was preformed about 4 hours after the wet. The refractory made from wet clay was smoother than the dry.
In the Hydrated Clay Procedure 1.25 lbs of bentonite absorbed 5.5lbs of water and would have taken more it provided. Equal water was added to the dry along with the clay. Both mixes were made stiff for brick making.
It is now the next morning about 12 hours since the dry was done. I am now thinking I should have covered then with wet towels. The surfaces are not gray so not dry. Moved all but 2 of the test cubes to the wet box. AKA old food freezer with a bit of water in the bottom.
2 Weeks Later
------------------------------------------------------------------------------------
The bricks were removed from the wet chest and dried on a furnace vent in my office. Both hydrated and dry bricks were used in reassembling the Kerr 666,
The furnace was heated to 710 degrees. Then I cooled the furnace and removed the heating elements and bricks. The DIY bricks are on the crumbly side but holding together. This video is repeated in the next Kerr 666 post.
The large block created in the 2 refractory experiment is harder than these which are still on the crumbly side. I left these air dry and put them in the water the next day when the could be safely removed from the forms aka molds. On the 2nd refractory experiment I covered the we mix in the mold with a wet towel earlier in the process. But it also used 5 parts native clay and 1 part bentonite. So I don't know that this experiment has resulted in usable information.
This experiment not happen quickly. If the repair of the 666 fails I may take my best guess at a refractory formula and build another oven. The 666 is too small and on the slow side. More on that in another post.
In this experiment I want to look at variations on Traditional Oven's refractory mortar formula. 10 : 6 : 2 : 3 – Sand, Fire Clay, Portland cement, and Lime. I assume this is based on volume as will all measures. For non refractory use the ratio of cement to lime is given as 1:1. Given that the cement will burn out it makes sense to favor the lime in refractories. Ratios are Sand:SilicaFlour:Clay:Cement:Lime:Perlite
A: 10:0:6:2:3:0 control sample
Test the addition of Perlite B: 10:0:6:2:3:3 C: 10:0:6:2:3:5 D: 10:0:6:2:3:7 E: 10:0:6:2:3:9 F: 10:0:6:2:3:11 Test substitution of Silica Flour for Sand G: 9:1:6:2:3:0 H: 8:2:6:2:3:0 I: 7:3:6:2:3:0 J: 6:4:6:2:3:0 K: 5:5:6:2:3:0 Each sample will be prepared twice. Once with my local clay and once with bentonite. So we will have samples AL AB BL BB CL CB .... All sample use x:y:6:2:3:z. That allows me to make a base mix and add x, y, and z. But its best if we hold back the clay and add it 10 minutes after mixing the rest. So the base mix will be 0:0:2:3:0 which means we just mix the cement an lime. I can do that in the cement mixer come ball mill. Lime is nasty stuff but this will be OK because the lime will be in a canister inside a 5 gallon bucket with a screw top inside the mixer held in place by foam rubber. This will total 22 samples.
I am concerned that replaced equal volumes of sand with silica flour may result in less overall refractory. Need to see what the weight ratio is.
In a previous post on Zombie Engines I talked about this failed plaster brick. It was
1:1 Plaster of Paris (POP) to Silica Flour (SF)
3:1 Water to Sodium Silicate (SS)
An unknown quantity of perlite
There are a lot of variables here but only two obvious questions. First what caused the POP to form lumps when added to the liquid. Second why did it crumble when dry.
Two test samples were prepared Sept 24, a week ago. Both are 1:1: POP:SF. The first is made with water and the second a 3:1 water:SS.
Both set up. After several days both were ramped up to 450F and soaked for an hour in the toaster oven. Both are fine. As usual the one with SS is softer. I expect high heat would fix that.
So one would tend to blame the perlite. More tests are required. Watch for the clumping, curdling.
The following will all include perlite
1. POP
2. POP with SF
3. POP with SF and SS (expected failure)
The run them all again and hydrate both the SF and the perlite.
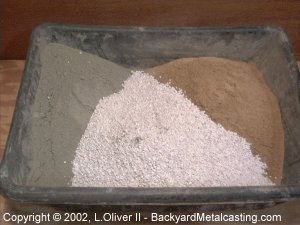
The refractory mix is composed of Portland cement (1.5 parts), silica sand (2 parts), perlite (1.5 parts) and fireclay (2 parts). The first three components are mixed together thoroughly. I used a 1-gallon bucket to measure the parts. Less than one bag of perlite was necessary for the bucket furnace and I had about a gallon and a quarter of refractory left over. Tip: Build the body for a coffee can furnace and use the remaining refractory for that. Or mold the remainder into plinth blocks or bricks.
If you found hard locating refractory cement don't worry, here is one mixing formula with Portland cement plus lime available in ordinary building stores.
There are two Portland cement types, get the common gray in color, the other one is white decorative used for around pools etc. where a white effects are required.
Lime is calcium it takes over the cement in hot conditions (Portland will gradually burn out, it is used only for the mortar to set while working.)
10 : 6 : 2 : 3 – Sand, Fire Clay, Portland cement, and Lime.
First mix all dry ingredients well. Then in small amounts start adding clean water at room temperature while continuing mixing.
Mix into peanut butter consistency. Apply thinly between firebricks and only in those places where needed e.g. in "V" sections between arched bricks on outside. Inside the arch - these bricks should be in line next to each other touching without gaps.
Note that the above formula is for mortar. Given that it is 2+3 parts of cement + lime I am thinking that 5 parts of perlite would work to make it more insulation.
I want to caution everyone up front that lime is nasty nasty stuff. I wore a good particle mask, glasses, and nitrite gloves. Thinking I should have used a better mask.
If you found hard locating refractory cement don't worry, here is one mixing formula with Portland cement plus lime available in ordinary building stores.
There are two Portland cement types, get the common gray in color, the other one is white decorative used for around pools etc. where a white effects are required.
Lime is calcium it takes over the cement in hot conditions (Portland will gradually burn out, it is used only for the mortar to set while working.)
10 : 6 : 2 : 3 – Sand, Fire Clay, Portland cement, and Lime.
First mix all dry ingredients well. Then in small amounts start adding clean water at room temperature while continuing mixing.
Mix into peanut butter consistency.
and...
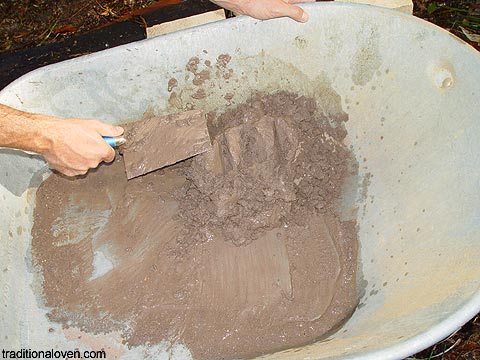
Mix it in wheelbarrow or straight in a bucket. After mortar looks mixed well, leave it for couple of minutes and then remix one more time. It will have slight thicker consistency after 2 mins., you may have to add a SPOON of water and mix to a peanut butter consistency. Prepare smaller quantity at the time, e.g. for one dome arch. Amount on the picture is nearly for all 3 aches, for making complete rectangular dome ceiling. ... Hoy, Rado that stuff looks quite mushy in there, oi it is mushy is it not? ... Oy ye, ye mate it is mushy, it always is mushy, ye.
Nabbed a dryer drum. It just might make a nice shell for a larger electric aluminum furnace. Maybe use sodium-silicate sand mix to form the hot face and wire looms. Back that with rock wool if the stuff I have is still good. If not upgrade everything to take brass.
UPDATE: This is a bit on the big side but still might work. Would be better suited for a spin casting sheild.


 In a previous post on Zombie Engines I talked about this failed plaster brick. It was

 Nabbed a dryer drum. It just might make a nice shell for a larger electric aluminum furnace. Maybe use sodium-silicate sand mix to form the hot face and wire looms. Back that with rock wool if the stuff I have is still good. If not upgrade everything to take brass.
 I was getting roasted trying to remove the floating embers. The corrugated sheet metal was drafted for use as a heat shield.

