Monday, April 26, 2021

Some furnace rules of thumb


I recall seeing those “rules of the fingers” on “the home foundry”. What I recall is that they all relate to the bore of the furnace. One is that your exhaust needs to be between .25 and .33 of the bore. Another is your tuyere - where the burner goes - is a bit smaller than your exhaust. How much smaller - good question.
The rules are most crucial when one wants or needs maximal performance, e.g. high temperatures. (This might well explain why aluminum is easier to melt than say, bronze.)
Another I recall is that oil wants more room than gas. Propane, say, can burn readily with an inch per side, though more is wise if you need it for your tongs. Oil wishes at least twice that.

Tuesday, April 20, 2021

Sliding Abrasive Saw -- was -- Radial Arm Cut Off

 There are two similar projects on youtube.


I started on mine prior to seeing either of these.  But I did borrow JSK-koubou's handle.   Mine also has depth control, can be angled, and raised for cutting parts that do not lay flat on the table..  I am guessing that when using the front brace mine is more accurate.   Mine is still under development.

Sunday, April 18, 2021

Scratch built Acute Tool Sharpening System (Part 1A more tables)


I like this table enough to realize I would like one at each grinding wheel.   To speed this up I constructed the radial cut off saw.   Currently I have cut out blanks for 2 more tables.   I have also cut the arms for the parallel motion arms of the mechanism on top the table.   

Currently the table bracket strips are soaking in vinegar to remove the mill scale.

Cutting these blanks which are simple strips was a good way to help refine the radial cut off.   The next step will be to cuts the parallel motion arms and table link to length.    I plan to make a fixture to hold the table angle brackets for cutting the triangular shape.  Maybe permanently attach them to a board that can be set into the saw.  An alignment block on the board would help position it relative to the cut off wheel.  Thinking as I type here.


The blanks were lightly sanded to clean them up after the vinegar bath.  Forget the grit maybe 280.  It was something odd. A before and after shot.


All the blanks to make 2 more tables with a few spares.
Fixture to cut the angles for the bottom brackets is clamped to the work table.


Thursday, April 15, 2021

Magnetic LED work light.

My wife ordered a pair of these and gave me one.   The magnet is quite strong and the light good.  Like the switch on the base.  It works well on this little HF drill press in the wood shop.  Going to get a few more.


Friday, April 2, 2021

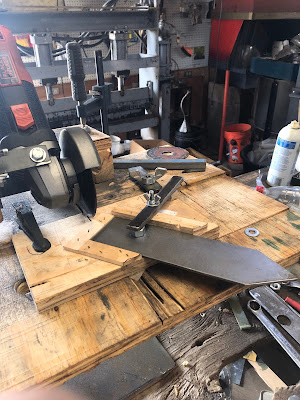
Radial Arm Cut Off


 Have made some progress but kind of stopped writing about it here.   The machine is working and I am striving to improve its accuracy.   As of today cuts vary from 50 thou down to 10 on the best results.   I would like to get it consistently to 10 if possible.

For this application just say no to HF Warrior disks.   The Diablo .040 I am using give best results if the outer 3/4 inch is gone.

Have tried adding weight to the handle.   Obviously the more weight the faster it cuts.

I think the next step is to add a depth limiting wheel that rides on the work.  The idea is to make several controlled passes.  Get the entire cut to 1/4 the thickness, then 1/2, 3/4, and finish.  Something like that.  Thinking is that my worst problems are where most of the cut is done and I have to concentrate on the bridges.

Am playing with the shop vac for dust collection.   

I will try to remember to add images soon.

---------------------------------------------------------------

Been talking with Chirpy.   Rather then a wheel to limit depth I am adding a depth stop with a adjusting wheel that references the linear bearing setup.   The downside is that if the work is not parallel to the rail it will go in at an angle.  Have to work on that. -

In the image you can see the depth stop.  Still have to make a plate on top with a hole for the threaded rod. 

The adjustment wheel is an old pulley. It's bore was too large so I loctited a steel threaded bushing into its hub.  I may put it back on the lathe and make it a little more user friendly, if it works.   Still have to make a plate on top with a hole for the threaded rod. 

Center right you see black tape on the handle.  The tape holds a slug of lead to the other side of the handle.  By changing this weight one can adjust the cutting force.


-------------------------------------------------------------------------

April 18


The plate spaces the angle bracket down so it clears the bumps on the bottom of the linear bearings.  It also provides a guide hole for the dept control.

I have added a removable plate to the front of the arm to increase stability.   No picture of that atm.

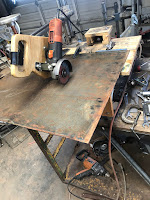
Here I have removed the front plate to cut a strip off a sheet of 1/8" steel longer than the travel of the grinder.  This is after I  flipped the sheet to make the 2nd cut.